Feed Integrations
Server version 5.5.0 adds support for Feed integrations. Feed integrations allow fetching indicators from feeds, for example TAXII, AutoFocus, Office 365, and so on.
An example Feed integration can be seen here.
Feed integrations are developed the same as other integrations. They provide a few extra configuration parameters and APIs.
Naming Convention#
Feed Integration names (id, name and display fields) should end with the word Feed. This consistent naming convention ensures that users can easily understand what the integration is used for.
Supported Server Version#
A Feed integration's YAML file must have the following field fromversion: 5.5.0. This is because Feed integrations are only supported from server version 5.5.0 and onwards.
Required Parameters#
Every Feed integration should have the following parameters in the integration YAML file:
The defaultvalue of the feedReputation, feedReliability, feedExpirationPolicy, and feedFetchInterval parameters should be set according to the qualities associated with the feed source for which you are developing a feed integration.
Incremental Feeds#
Incremental Feeds pull only new or modified indicators that have been sent from the 3rd party vendor. As the determination if the indicator is new or modified happens on the 3rd-party vendor's side, and only indicators that are new or modified are sent to Cortex XSOAR, all indicators coming from these feeds are labeled new or modified.
Examples of incremental feeds usually include feeds that fetch based on a time range. For example, a daily feed which provides new indicators for the last day or a feed which is immutable and provides indicators from a search date onwards.
To indicate to the Cortex XSOAR server that a feed is incremental, add the configuration parameter: feedIncremental. If the user is not able to modify this setting, set the parameter to hidden with a defaultValue of true. For example:
If the feed supports both incremental and non-incremental modes, provide the configuration parameter as non-hidden. Thus, a user will be able to modify this settings as is fit. In the feed code inspect the feedIncremental parameter to perform the proper fetch logic.
Code examples of Incremental Feeds:
Commands#
Every Feed integration will at minimum have three commands:
test-module- this is the command that is run when theTestbutton in the configuration panel of an integration is clicked.<product-prefix>-get-indicators- where<product-prefix>is replaced by the name of the Product or Vendor source providing the feed. So for example, if you were developing a feed integration for Microsoft Intune, this command might be calledmsintune-get-indicators. This command should fetch a limited number of indicators from the feed source and display them in the war room.fetch-indicators- this command will initiate a request to the feed endpoint, format the data fetched from the endpoint to conform to Cortex XSOAR's expected input format, and create new indicators. If the integration instance is configured toFetch indicators, then this is the command that will be executed at the specifiedFeed Fetch Interval.
API Command: demisto.createIndicators()#
Use the demisto.createIndicators() function when the fetch-indicators command is executed. Let's look at an example main() from an existing Feed integration.
The batch function is imported from CommonServerPython. We see that indicators are returned from calling fetch_indicators_command and are passed to demisto.createIndicators in batches.
Indicator Objects#
Indicator Objects passed to demisto.createIndicators. Let's look at an example,
Let's review the object key and values.
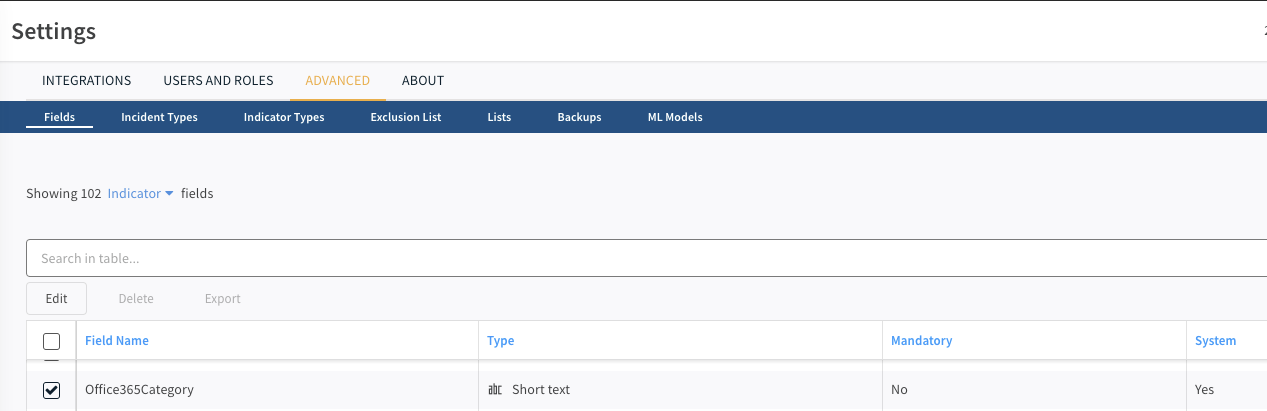
"value"- required. The indicator value, e.g.,"8.8.8.8"."type"- required. The indicator type (types as defined in Cortex XSOAR), e.g.,"IP". One can use theFeedIndicatorTypeclass to populate this field. This class, which is imported fromCommonServerPythonhas all of the indicator types that come out of the box with Cortex XSOAR. It appears as follows,"rawJSON"- required. This dictionary should contain the"value"and"type"fields as well as any other unmodified data returned from the feed source about an indicator."fields"- optional. A dictionary that maps values to existing indicator fields defined in Cortex XSOAR where the key is theclinameof an indicator field. To see the full list of possible fields:- Go to the
Settingssection in Cortex XSOAR. - Click the
ADVANCEDtab. - Go to the
Fieldssection and filterindicatorfields. - To inspect a specific field - tick the box near the field name and click
Edit. Note that when inspecting a field, it'sclinameis listed asmachinename.
- Go to the
"relationships"- optional. This list should contain a dictionary of values of the relationships. There are two way to create relationships:As part of creating an indicator.
Creating only relationships without an indicator.
For both ways use
demisto.createIndicators
Steps to create the relationships:
Create an
EntityRelationshipobject with the relationships data. If more than one relationship exists, create a list and append all of theEntityRelationshipobjects to it.The name of the relationships should be one of the exisitng relationships : https://xsoar.pan.dev/docs/reference/api/common-server-python#relationships
For more information, see: https://xsoar.pan.dev/docs/reference/api/common-server-python#entityrelationship
Use the
to_indicator()function of the object to convert each object (or a list of objects) to the required format.If the relationships is part of an indicator:
- Add to the
relationshipkey of the indicator the list after runningto_indicator.
If the relationship is not attached to an indicator:
- We will need to create a dummy indicator whose value is
$$DummyIndicator$$and add the relationships key with the list after runningto_indicator.
- Add to the
Note: In indicators of type "File", if you have multiple hash types for the same file (i.e., MD5, SHA256, etc.), you can use the corresponding "fields" to associate all hashes to the same object. The supported fields are: md5, sha1, sha256, sha512, ssdeep. You can use any of the aforementioned hash types as the indicator value for an indicator of type "File".